This is part 6 of a series of posts about getting BIM data into Unity.
In this post, we’ll discuss how we can display our parsed metadata, which is now attached to our GameObjects, on-screen.
But not every geometry can be “seen” by such a Ray.
There are two ways to add a Mesh Collider to imported geometry: you can do this at the level of the Importer Settings. Select a model in the Project Window and check the “Generate Mesh Colliders” in the Inspector. For Large models this may take a while and it will slow down your whole model. The alternative is adding the Mesh Collider manually but only for the meshes where it is required. This is another level of optimisation: avoid adding colliders which will never collide or be selected.
We do this as part of the Update() method, so picking is always available. We first check if we are pressing a mouse button.
// Update is called once per frame
void Update () {
if (Input.GetMouseButtonDown(0) || Input.GetMouseButton(0)) {
We prepare our Ray to cast from the click position. We need a RaycastHit and Ray object. The ray will be cast from the current mouse position and uses a camera method to translate our screen point into a Ray.
RaycastHit hit;
Ray ray = Camera.main.ScreenPointToRay(Input.mousePosition);
We then investigate the results of the clicked point, via the “hit” structure. It provides us with the normal (perpendicular on the hit surface), the distance from our view plane and the object which was hit (actually its collider). In our example, we only need the collider.
if (Physics.Raycast(ray, out hit, 50)) {
Vector3 orto = hit.normal;
float dist = hit.distance;
Collider colly = hit.collider;
For debugging reasons, we can also draw a line to visualise the Ray, but this is only visible inside the Editor when running our game for testing (and only seen in the Scene Tab).
// only visible in Editor!
Debug.DrawLine(ray.origin, hit.point);
Now we have our object and we can request the meta-data we prepared earlier on.
We have to distinguish between having the mesh as child (as in the ARCHICAD export) and the mesh combined with the rest of the object (as in the Revit export). We therefore also check the Parent transform, when our first attempt at finding the component
// get metadata component from collided object
string collyName = colly.gameObject.name;
metadata meta = colly.gameObject.GetComponent<metadata>();
// Check if we actually have a metadata component
if (meta == null){
// If no metadata is attached, it might be attached to the parent
Transform myParent = colly.gameObject.transform.parent;
if (myParent != null){
meta = myParent.GetComponent<metadata>();
collyName = myParent.name;
}
}
// Do something with the metadata…
We are now ready to collect the metadata strings to be displayed. Let’s add them to a buffer string first. We add a private variable on the level of our class (outside of the Update method) so we can reuse the string in our dialog code later on.
private string buffer = "";
It may be possible that we don’t find any metadata component at all. In that case, we just use the GameObject name.
Let’s expand our previous code:
// Do something with the metadata…
if (meta != null){
buffer = collyName + "\n";
for (int i = 0; i < meta.keys.Length; i++) {
if (meta.keys[i] != "")
buffer += meta.keys[i] + "\t= " + meta.values[i] + "\n";
}
} else {
buffer = colly.name + " was hit!";
}
To give us some feedback during development, we’ll add a simple Debug message on the console.
Debug.Log(buffer);
Looking at the Unity Console Tab, we now see the feedback (you have to click on the “warning” line in the Console to expand the content of the string, as it contains line breaks):
Displaying a dialog (old OnGUI method)
To give the user real feedback at runtime, we can display a dialog. While Unity has evolved it’s GUI system quite extensively, we will use the old OnGUI() method as it’s more concise and can be organised in just a few lines of code.
void OnGUI() {
// POPUP configuration
float popupWidth = 200; // width of our popup dialog
float padding = 10; // some space
float paddingBottom = 60; // distance from bottom of screen
float xpos = Screen.width - popupWidth - padding;
float w = popupWidth;
float h = Screen.height - padding * 2 - paddingBottom;
GUI.BeginGroup (new Rect (xpos, padding, w, h));
GUI.Box (new Rect (0, 0, w, h), "Object Info");
GUI.Label (new Rect (padding, 20 + padding, w - padding * 2, h - padding * 2 - 20), buffer);
GUI.EndGroup ();
}
The result is a dialog box, shown to the right of the screen, with the buffer text displayed. A bit rough for now, but we get what we need.
Some further refinements: the dialog shows the info for the last clicked object. The buffer should be cleared if we don’t hit something. This may be toggled with a Boolean, which is only set to true if we actually get to an object and set to false otherwise, so the OnGUI() method can use it to skip showing the dialog when not needed.
To refine the experience a bit, we can also use a timer to display the dialog just for a few seconds and hide it again afterwards. The possibilities are endless in how to interact and display this.
The full code for this lesson…
using System.Collections;
using System.Collections.Generic;
using UnityEngine;
public class getMetadata : MonoBehaviour {
private string buffer = "";
private bool displayHit = false;
// Update is called once per frame
void Update () {
if (Input.GetMouseButtonDown(0) || Input.GetMouseButton(0)) {
RaycastHit hit;
Ray ray = Camera.main.ScreenPointToRay(Input.mousePosition);
if (Physics.Raycast(ray, out hit, 50)) {
displayHit = true;
Vector3 orto = hit.normal;
float dist = hit.distance;
Collider colly = hit.collider;
// only visible in Editor!
Debug.DrawLine(ray.origin, hit.point);
// get metadata component from collided object
string collyName = colly.gameObject.name;
metadata meta = colly.gameObject.GetComponent<metadata>();
// Check if we actually have a metadata component
if (meta == null){
// If no metadata is attached, it might be attached to the parent
Transform myParent = colly.gameObject.transform.parent;
if (myParent != null){
meta = myParent.GetComponent<metadata>();
collyName = myParent.name;
}
}
// Do something with the metadata…
if (meta != null){
buffer = collyName + "\n";
for (int i = 0; i < meta.keys.Length; i++) {
if (meta.keys[i] != "")
buffer += meta.keys[i] + "\t= " + meta.values[i] + "\n";
}
} else {
buffer = colly.name + " was hit!";
}
Debug.Log(buffer);
} else
displayHit = false;
}
}
void OnGUI() {
// Display Popup only when we hit an object
if (displayHit) {
// POPUP configuration
float popupWidth = 200; // width of our popup dialog
float padding = 10; // some space
float paddingBottom = 60; // distance from bottom of screen
float xpos = Screen.width - popupWidth - padding;
float w = popupWidth;
float h = Screen.height - padding * 2 - paddingBottom;
GUI.BeginGroup (new Rect (xpos, padding, w, h));
GUI.Box (new Rect (0, 0, w, h), "Object Info");
GUI.Label (new Rect (padding, 20 + padding, w - padding * 2, h - padding * 2 - 20), buffer);
GUI.EndGroup ();
}
}
}
In this post, we’ll discuss how we can display our parsed metadata, which is now attached to our GameObjects, on-screen.
Picking objects on screen with Raycasting
Unity uses Raycasting, which shoots a finite ray into the scene, as the connecting line between your 3D camera position (your viewpoint) and the point you click on-screen, which can be translated into a 3D position on the viewing plane. That ray can intersect geometry and it will return the item you clicked on, alongside the position and orientation of the hit point.But not every geometry can be “seen” by such a Ray.
Preparing geometry for selection
To be able to select an object you need two things: geometry to click on and geometry you can see. In most Game Engines, these things are not equal. In Unity, you can have a Mesh component, which carries the Mesh data (vertices, faces). In addition, there is a Mesh Renderer, which ensures the mesh is visible on-screen. However, with only these two, you cannot select anything.Getting the right Collider
To allow a Ray to “hit” a mesh geometry, it needs to have something to hit, which is not the Mesh as such, but a collider: some invisible geometry which is used in Collision Detection. In game development, you’d use the simplest shape you can get away with. Ideally a box or sphere, but it can also be a complex 3D mesh. For convenience, you can use a Mesh Collider, which duplicates the Mesh Geometry into a Collision Mesh. However, understand that this is by definition the least optimised solution, as this may contain a multitude of additional geometry to handle. If you can simplify objects, do so. E.g. a small table may contain intricate geometry, but may use a simple Cylinder or Box Collider, which is much quicker and lighter to handle. Moreover, it’ll lessen the burden on the collision calculations and can avoid some nasty errors, where you may even get “stuck” inside an object.There are two ways to add a Mesh Collider to imported geometry: you can do this at the level of the Importer Settings. Select a model in the Project Window and check the “Generate Mesh Colliders” in the Inspector. For Large models this may take a while and it will slow down your whole model. The alternative is adding the Mesh Collider manually but only for the meshes where it is required. This is another level of optimisation: avoid adding colliders which will never collide or be selected.
Where to place the colliders for your imported BIM geometry?
Finding the right object inside ARCHICAD and Revit may require different approaches. As mentioned in the previous post, the export from ARCHICAD (via CINEMA 4D) gives a deeper hierarchy: objects with their geometric components as children underneath. The Revit conversion gives a flat tree: mesh and object are combined in single objects. We try to support both scenario’s in one go, but this requires some coding.And now the code…
So let’s start to develop our picking code in a new C# Script, called “getMetadata.cs”.We do this as part of the Update() method, so picking is always available. We first check if we are pressing a mouse button.
// Update is called once per frame
void Update () {
if (Input.GetMouseButtonDown(0) || Input.GetMouseButton(0)) {
We prepare our Ray to cast from the click position. We need a RaycastHit and Ray object. The ray will be cast from the current mouse position and uses a camera method to translate our screen point into a Ray.
RaycastHit hit;
Ray ray = Camera.main.ScreenPointToRay(Input.mousePosition);
We then investigate the results of the clicked point, via the “hit” structure. It provides us with the normal (perpendicular on the hit surface), the distance from our view plane and the object which was hit (actually its collider). In our example, we only need the collider.
if (Physics.Raycast(ray, out hit, 50)) {
Vector3 orto = hit.normal;
float dist = hit.distance;
Collider colly = hit.collider;
For debugging reasons, we can also draw a line to visualise the Ray, but this is only visible inside the Editor when running our game for testing (and only seen in the Scene Tab).
// only visible in Editor!
Debug.DrawLine(ray.origin, hit.point);
 |
| Debug.DrawLine(…) visible in the Scene Tab when running the game |
We have to distinguish between having the mesh as child (as in the ARCHICAD export) and the mesh combined with the rest of the object (as in the Revit export). We therefore also check the Parent transform, when our first attempt at finding the component
// get metadata component from collided object
string collyName = colly.gameObject.name;
metadata meta = colly.gameObject.GetComponent<metadata>();
// Check if we actually have a metadata component
if (meta == null){
// If no metadata is attached, it might be attached to the parent
Transform myParent = colly.gameObject.transform.parent;
if (myParent != null){
meta = myParent.GetComponent<metadata>();
collyName = myParent.name;
}
}
// Do something with the metadata…
We are now ready to collect the metadata strings to be displayed. Let’s add them to a buffer string first. We add a private variable on the level of our class (outside of the Update method) so we can reuse the string in our dialog code later on.
private string buffer = "";
It may be possible that we don’t find any metadata component at all. In that case, we just use the GameObject name.
Let’s expand our previous code:
// Do something with the metadata…
if (meta != null){
buffer = collyName + "\n";
for (int i = 0; i < meta.keys.Length; i++) {
if (meta.keys[i] != "")
buffer += meta.keys[i] + "\t= " + meta.values[i] + "\n";
}
} else {
buffer = colly.name + " was hit!";
}
To give us some feedback during development, we’ll add a simple Debug message on the console.
Debug.Log(buffer);
Looking at the Unity Console Tab, we now see the feedback (you have to click on the “warning” line in the Console to expand the content of the string, as it contains line breaks):
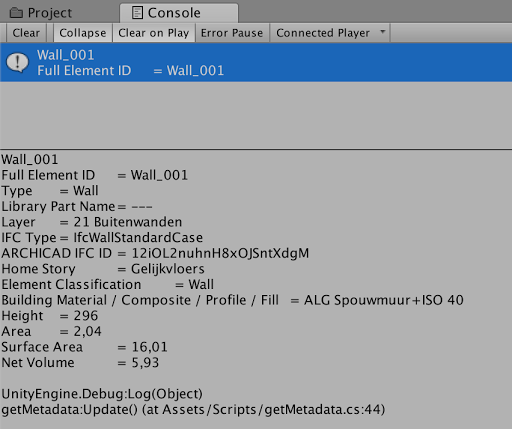 |
| Feedback in the Console when picking an object |
Displaying a dialog (old OnGUI method)
To give the user real feedback at runtime, we can display a dialog. While Unity has evolved it’s GUI system quite extensively, we will use the old OnGUI() method as it’s more concise and can be organised in just a few lines of code.
void OnGUI() {
// POPUP configuration
float popupWidth = 200; // width of our popup dialog
float padding = 10; // some space
float paddingBottom = 60; // distance from bottom of screen
float xpos = Screen.width - popupWidth - padding;
float w = popupWidth;
float h = Screen.height - padding * 2 - paddingBottom;
GUI.BeginGroup (new Rect (xpos, padding, w, h));
GUI.Box (new Rect (0, 0, w, h), "Object Info");
GUI.Label (new Rect (padding, 20 + padding, w - padding * 2, h - padding * 2 - 20), buffer);
GUI.EndGroup ();
}
The result is a dialog box, shown to the right of the screen, with the buffer text displayed. A bit rough for now, but we get what we need.
 |
| Dialog shown when picking an object |
To refine the experience a bit, we can also use a timer to display the dialog just for a few seconds and hide it again afterwards. The possibilities are endless in how to interact and display this.
The full code for this lesson…
using System.Collections;
using System.Collections.Generic;
using UnityEngine;
public class getMetadata : MonoBehaviour {
private string buffer = "";
private bool displayHit = false;
// Update is called once per frame
void Update () {
if (Input.GetMouseButtonDown(0) || Input.GetMouseButton(0)) {
RaycastHit hit;
Ray ray = Camera.main.ScreenPointToRay(Input.mousePosition);
if (Physics.Raycast(ray, out hit, 50)) {
displayHit = true;
Vector3 orto = hit.normal;
float dist = hit.distance;
Collider colly = hit.collider;
// only visible in Editor!
Debug.DrawLine(ray.origin, hit.point);
// get metadata component from collided object
string collyName = colly.gameObject.name;
metadata meta = colly.gameObject.GetComponent<metadata>();
// Check if we actually have a metadata component
if (meta == null){
// If no metadata is attached, it might be attached to the parent
Transform myParent = colly.gameObject.transform.parent;
if (myParent != null){
meta = myParent.GetComponent<metadata>();
collyName = myParent.name;
}
}
// Do something with the metadata…
if (meta != null){
buffer = collyName + "\n";
for (int i = 0; i < meta.keys.Length; i++) {
if (meta.keys[i] != "")
buffer += meta.keys[i] + "\t= " + meta.values[i] + "\n";
}
} else {
buffer = colly.name + " was hit!";
}
Debug.Log(buffer);
} else
displayHit = false;
}
}
void OnGUI() {
// Display Popup only when we hit an object
if (displayHit) {
// POPUP configuration
float popupWidth = 200; // width of our popup dialog
float padding = 10; // some space
float paddingBottom = 60; // distance from bottom of screen
float xpos = Screen.width - popupWidth - padding;
float w = popupWidth;
float h = Screen.height - padding * 2 - paddingBottom;
GUI.BeginGroup (new Rect (xpos, padding, w, h));
GUI.Box (new Rect (0, 0, w, h), "Object Info");
GUI.Label (new Rect (padding, 20 + padding, w - padding * 2, h - padding * 2 - 20), buffer);
GUI.EndGroup ();
}
}
}
Comments
Post a Comment